1、文件读写 1、打开文件 使用open()函数来进行文件的读写,调用close()来关闭文件
1
2
3
4
5
6
7
8
file = open(file, mode='r' , buffering=-1 , encoding=None , errors=None , newline=None , closefd=True , opener=None ) file.close()
打开模式:
字符
意义
'r'读取(默认)
'w'写入,并先截断文件
'x'排它性创建,如果文件已存在则失败
'a'写入,如果文件存在则在末尾追加
'b'二进制模式
't'文本模式(默认)
'+'更新磁盘文件(读取并写入)
2、普通文件读写 1、文件读取 1 2 3 4 5 6 7 8 9 10 11 12 13 file = open('./Others/sample.txt' ) content = file.read() content = file.readline() file.close() for line in open('./Others/sample.txt' ): print(line, end='' )
2、文件写入 1 2 3 4 5 6 7 file = open('./Others/sample.txt' , 'w' ) file.write('98765\n' ) file.write('43210\n' ) file.writelines(['01234\n' , '56789\n' ]) file.close()
3、CSV文件读写 1 2 3 4 5 6 7 8 9 10 11 12 13 14 15 16 17 18 19 20 21 22 23 24 import csvdef csv_read () : csvfile = open('./Others/tmp.csv' , 'r' ) reader = csv.reader(csvfile) for row in reader: print(row) csvfile.close() def csv_write () : csvfile = open('./Others/tmp.csv' , 'w' ) writer = csv.writer(csvfile) writer.writerow(['title' , 'url' ]) writer.writerow(['6' , '7' ]) writer.writerow(['8' , '9' ]) writer.writerow(['0' , '0' ]) csvfile.close() if __name__ == "__main__" : csv_read() csv_write()
4、Json文件读写 1 2 3 4 5 6 7 8 numbers = [0 , 1 , 2 , 3 , 4 , 5 , 6 , 7 , 8 , 9 ] with open(cur_path + 'tmp.json' , 'w' ) as file: '''Json文件写入''' json.dump(numbers, file) with open(cur_path + 'tmp.json' , 'r' ) as file: '''Json文件读入''' numbers = json.load(file) print(numbers)
5、Excel文件读写 1、安装模块 2、Excel文件读取 1 2 3 4 5 6 7 8 9 10 11 12 13 14 15 16 17 18 19 20 def read () : readbook = xlrd.open_workbook(cur_path+'tmp.xlsx' ) sheet: xlrd.sheet.Sheet sheet = readbook.sheet_by_index(2 ) sheet = readbook.sheet_by_name('Sheet1' ) nrows = sheet.nrows ncols = sheet.ncols print(nrows, ncols) value = sheet.cell(0 , 0 ).value print(value) row = sheet.row(0 ) col = sheet.col(0 ) print(row) print(col)
3、Excel文件写入 1 2 3 4 5 6 7 8 9 10 11 12 def write () : writebook = xlwt.Workbook() sheet: xlwt.Worksheet sheet = writebook.add_sheet('Sheet1' ) value = 'test' sheet.write(0 , 0 , value) writebook.save(cur_path+'tmp_1.xlsx' )
2、函数 1、传递任意数量的实参 1 2 3 4 5 6 7 8 9 10 11 def make_pizza (size, *toppings) : '''多个实参传进来会封装成一个元组''' print("Making a %d-inch pizza with the following toppings:" % size) for topping in toppings: print('- ' + topping) if __name__ == "__main__" : make_pizza(16 , 'pepperoni' ) make_pizza(12 , 'mushrooms' , 'green peppers' , 'extra cheese' )
2、使用任意数量的关键字实参 1 2 3 4 5 6 7 8 9 10 11 12 13 14 15 def build_profile (first, last, **user_info) : '''多个实参传进来会封装成一个元组''' profile = {} profile['first_name' ] = first profile['last_name' ] = last for key, value in user_info.items(): profile[key] = value return profile if __name__ == "__main__" : user_profile = build_profile( 'albert' , 'einstein' , location='princeton' , field='physics' ) print(user_profile)
3、类 1、定义类 1 2 3 4 5 6 7 8 9 10 11 12 13 14 15 16 17 18 19 class Myclass (object) : def __init__ (self, name=None) : self.name = 'null' if name is not None : self.name = name def getName (self) : return self.name def setName (self, name) : self.name = name tmp = Myclass('Tom' ) tmp.setName('Jack' ) tmp.getName()
2、继承 1 2 3 4 5 6 7 8 9 10 11 12 13 14 15 16 17 18 19 20 21 22 23 24 25 26 27 28 29 30 31 32 33 34 35 36 37 38 39 class Person (object) : def __init__ (self, name) : self.name = name def get_details (self) : return self.name class Student (Person) : def __init__ (self, name, branch, year) : Person.__init__(self, name) self.branch = branch self.year = year def get_details (self) : return "{} studies {} and is in {} year." .format(self.name, self.branch, self.year) class Teacher (Person) : def __init__ (self, name, papers) : Person.__init__(self, name) self.papers = papers def get_details (self) : return "{} teachers {}." .format(self.name, ',' .join(self.papers)) per = Person('Sachin' ) stu = Student('Kushal' , 'CSE' , 2005 ) tea = Teacher('Prashad' , ['C' , 'C++' ]) print(per.get_details()) print(stu.get_details()) print(tea.get_details())
3、多继承 1 2 3 4 5 6 class MyClass (Parentclass1, Parentclass2,...) : def __init__ (self) : Parentclass1.__init__(self) Parentclass2.__init__(self) ... ...
4、属性 1 2 3 4 5 6 7 8 9 10 11 12 13 14 15 16 17 18 19 20 21 class Person (object) : person_name = 'person name' def __init__ (self) : self.name = 'name' self._name = '_name' self.__name = '__name' per = Person() print(Person.person_name) print(per.person_name) print(per.name) print(per._name)
5、方法 1 2 3 4 5 6 7 8 9 10 11 12 13 14 15 16 17 18 19 20 21 22 23 24 25 26 27 28 29 30 31 32 33 34 35 36 37 38 39 40 41 42 class Person (object) : country = 'China' def f1 (self) : print('实例方法' ) def __f2 (self) : print('私有方法' ) ''' 类方法是类所拥有的方法,需要用修饰器@classmethod来标识其为类方法。 类方法第一个参数必须是类对象,一般以cls作为第一个参数(就像self一样),也可以有别的参数。 ''' @classmethod def get_country1 (cls) : return cls.country ''' 静态方法需要通过修饰器 @staticmethod来进行修饰,静态方法不需要多定义参数。 ''' @staticmethod def get_country2 () : return Person.country per = Person() per.f1() Person.get_country1() per.get_country1() Person.get_country2() per.get_country2()
5、装饰器 更精确的调整控制属性访问权限,可以使用 @property 装饰器,@property 装饰器就是负责把一个方法变成属性调用的。
1 2 3 4 5 6 7 8 9 10 11 12 13 14 15 16 17 18 19 20 21 22 23 24 25 26 27 28 29 30 31 32 33 class Account (object) : def __init__ (self, rate) : self.__amt = 0 self.rate = rate @property def amount (self) : return self.__amt @property def cny (self) : return self.__amt * self.rate @amount.setter def amount (self, value) : if value < 0 : print("Sorry, no negative amount in the account." ) return self.__amt = value def main () : acc = Account(6.6 ) acc.amount = 20 print('Dollar amount:' , acc.amount) print('In CNY:' , acc.cny) acc.amount = -100 print('Dollar amount:' , acc.amount) if __name__ == '__main__' : main()
4、模块和包 1、模块 Python有一种方法可以把定义放在一个文件里,并在脚本或解释器的交互式实例中使用它们。这样的文件被称作 模块 ;模块中的定义可以 导入 到其它模块或者 主 模块(你在顶级和计算器模式下执行的脚本中可以访问的变量集合)。
导入模块,即调用另一个.py文件里的内容(两个文件位于相同目录,或者被调用文件位于Python路径)
1 2 3 4 5 6 7 8 9 10 11 12 13 14 15 ''' test文件,进行调用测试 ''' import dividingdef main () : dividing.star_line(10 ) dividing.hash_line(10 ) dividing.simple_liem(10 ) if __name__ == '__main__' : main()
1 2 3 4 5 6 7 8 9 10 11 12 13 14 ''' dividing.py 定义了分割线的函数 ''' def star_line (num) : print('*' * num) def hash_line (num) : print('#' * num) def simple_liem (num) : print('-' * num)
扩展:模块的搜索路径
模块的搜索路径都储存在sys.path列表中
1 2 3 import sysfor path in sys.path: print(path)
2、包 含有 __init__.py 文件的目录可以用来作为一个包,目录里的所有 .py 文件都是这个包的子模块。
如果 __init__.py 文件内有一个名为 __all__ 的列表,那么只有在列表内列出的名字将会被公开。
1 2 3 4 5 6 7 8 9 10 11 12 13 ''' tmp_1.py 调用mymodule测试 ''' import mymoduledef main () : mymodule.simple_liem(10 ) if __name__ == '__main__' : main()
1 2 3 4 5 6 ''' mymodule/__init__.py mymodule包的__init__.py文件 ''' from mymodule.dividing import simple_liem__all__ = [simple_liem, ]
1 2 3 4 5 6 7 8 9 10 11 12 13 14 ''' dividing.py 定义了分割线的函数 ''' def star_line (num) : print('*' * num) def hash_line (num) : print('#' * num) def simple_liem (num) : print('-' * num)
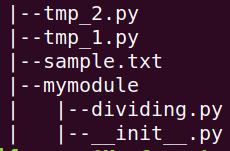
目录结构:需要注意的是tmp_1.py与mymodule包同级别路径
3、安装自定义包 1、自定义包 目录结构
1 2 3 4 5 6 7 |--MyModules | |--setup.py | |--src | | |--mm | | | |--downloader.py | | | |--tools.py | | | |--__init__.py
mm为自定义包,其中包含自定义模块tools.py
src/mm/__init__.py中导入模块,使用绝对引入
1 2 3 4 5 from __future__ import absolute_importfrom . import tools__all__ = [tools]
2、设置自定义包的参数 setup.py文件中设置包的相关参数
1 2 3 4 5 6 7 8 9 10 11 12 13 14 15 16 17 18 19 20 21 22 23 24 25 26 27 28 29 30 31 from distutils.core import setupfrom setuptools import find_packagessetup(name='mm' , version='1.1.0' , description='My common constants and functions' , author='Shifa Yang' , author_email='ysf504703038@163.com' , url='null' , license='' , classifiers=[ 'Intended Audience :: Developers' , 'Programming Language :: Python' , 'Programming Language :: Python :: 2' , 'Programming Language :: Python :: 2.5' , 'Programming Language :: Python :: 2.6' , 'Programming Language :: Python :: 2.7' , 'Programming Language :: Python :: 3' , 'Programming Language :: Python :: 3.2' , 'Programming Language :: Python :: 3.3' , 'Programming Language :: Python :: 3.4' , 'Programming Language :: Python :: 3.5' , ], keywords='' , packages=find_packages('src' ), package_dir={'' : 'src' }, include_package_data=True , )
3、安装 在命令行执行打包
就会生成一个dist目录,目录中有自定义包的安装包,到dist目录下使用pip安装
1 2 3 4 pip3 install packages pip install git+https://github.com/504703038/My-Python-Modules.git
5、压缩与解压 1、gz文件 1 2 3 4 5 6 7 8 9 10 11 12 13 14 15 16 17 18 19 20 21 22 23 24 25 26 27 28 29 30 31 32 33 34 35 36 import gzipdef compress (filename) : file = open(filename, 'rb' ) content = file.read() file.close() filename = filename+'.gz' gz_file = gzip.GzipFile(filename, 'wb' ) gz_file.write(content) gz_file.close() def decompress (filename) : gz_file = gzip.GzipFile(filename) content = gz_file.read() gz_file.close() filename = filename.replace('.gz' , '' ) file = open(filename, 'wb+' ) file.write(content) file.close() if __name__ == "__main__" : compress('./Others/sitemap_201103.xml' ) decompress('./Others/sitemap_201103.xml.gz' )
6、目录访问 1 2 3 4 5 6 7 8 9 10 11 12 import osdef file_name (file_dir) : for root, dirs, files in os.walk(file_dir): print('root_dir:' , root) print('sub_dirs:' , dirs) print('files:' , files) if __name__ == "__main__" : file_name('./Others' )
7、字符串编码转换 1 2 3 4 5 6 7 s = '编码' s = s.encode('utf-8' ) s = s.encode('gbk' ) s = b'\x08' s = s.decode('utf-8' )
8、print输出 1、保留小数 1 2 3 4 5 a = 0.123456789 b = 0.987654321 print('a = {:.5f}, b = {:.3f}' .format(a, b)) print('a = %.5f,b = %.3f' % (a,b))
输出结果:
可以看出,保留小数的时候会四舍五入,如果不想四舍五入
1 2 3 4 5 6 7 import matha = 0.123456789 b = 0.987654321 a = math.floor(a * 10 ** 5 ) / 10 ** 5 b = math.floor(b * 10 ** 3 ) / 10 ** 3 print(a, b)
9、字符串处理
方法 描述
string.capitalize()把字符串的第一个字符大写
string.center(width)返回一个原字符串居中,并使用空格填充至长度 width 的新字符串
string.count(str, beg=0, end=len(string))返回 str 在 string 里面出现的次数,如果 beg 或者 end 指定则返回指定范围内 str 出现的次数
string.find(str, beg=0, end=len(string))检测 str 是否包含在 string 中,如果 beg 和 end 指定范围,则检查是否包含在指定范围内,如果是返回开始的索引值,否则返回-1
string.rfind(str, beg=0,end=len(string) )类似于 find()函数,不过是从右边开始查找.
10、打印异常信息 1 2 3 4 5 6 7 8 import tracebacktry : 2 /0 except Exception as e: print(e) print('遇到错误:%s' %e) traceback.print_exc() traceback.format_exc()